Showing posts with label How to. Show all posts

PHP Fogを使ったPHPアプリ開発の始め方

ここではPHP Fogを使ったPHPアプリ開発を始める方法を説明しています。


ここで説明すること
この説明は最短ルートです。どのようにPHP Fogを使った開発をするかを説明します。
この説明ではEclipse, XAMPP, ブラウザをローカル環境で使用します。また、ソースコードアップロード用にGitを使います。


私の開発環境は以下のようになっています
  • Mac OS X 10.7
  • Eclipse Helios
  • XAMPP 1.7.3
  • Git 1.7.8.4
手順
以下の手順で説明をします。
I. 開発環境のインストール
II. PHP Fogにアプリを作成
III. SSH keyの作成
IV. リポジトリのクローンを作成
V. アプリをEclipseにインポート
VI. XAMPPの設定
VII. 開発とプッシュ(アップロード)
I. 開発環境のインストール
  1. Eclipseを取得してインストールします。http://www.eclipse.org/
  2. PDT(PHP development tool) をEclipseから取得してインストールします。
  3. EGitをEclipseから取得してインストールします。
  4. XAMPPを取得してインストールします。http://sourceforge.net/projects/xampp/
  5. Gitを取得してインストールします。https://code.google.com/p/git-osx-installer
#Eclipseからインストールする場合は[Help]メニューからInstall New Softwareを選択します。その後、取得元に「Helios - http://download.eclipse.org/releases/helios」を選択して、インストールするものを選択します。

II. PHP Fogにアプリを作成
  1. PHP Fogにアクセスしてサインアップします。https://phpfog.com/account
  2. プランを選択します。 (無料で使う場合はshared planを選択します。)
  3. アプリを登録します。
    様々なアプリやフレームワークを選択できます。
    シンプルなPHPアプリを作る場合はcustom PHP appを選択します。
III. SSH keyの生成
  1. .sshをホームディレクトリに持っていない場合は作成します。
    side7:~ xxx$ mkdir ~/.ssh
    side7:~ xxx$ cd ~/.ssh
    
  2. ホームディレクトリでSSH keyを作成します。
    side7:.ssh xxx$ ssh-keygen -t rsa
    
    Generating public/private rsa key pair.
    Enter file in which to save the key (/Users/xxx/.ssh/id_rsa):
    Enter passphrase (empty for no passphrase):
    Enter same passphrase again:
    Your identification has been saved in /Users/xxx/.ssh/id_rsa.
    Your public key has been saved in /Users/xxx/.ssh/id_rsa.pub.
    The key fingerprint is:
    [HEX KEY such as 4b:32:...........] xxx@side7.local
    The key's randomart image is:
    +--[ RSA 2048]----+
    [image]
    [image]
    [image]
    [image]
    [image]
    [image]
    +-----------------+
    
  3. SSH keyを確認します。
    side7:.ssh xxx$ ls
    id_rsa        id_rsa.pub
    
  4. SSH Pub keyをPHP FOGのアカウントに登録します。
    id_rsa.pubを開いて中のテキストをコピーします。そしてPHP FOGのアカウント情報にアクセスしてペーストします。
IV. PHP Fog上にあるリポジトリのクローンをローカルに作成
  1. あなたの好きなプロジェクトディレクトリに移動します。
  2. side7:php xxx$ cd /Users/xxx/dev/php/
    
  3. リポジトリのクローンを作成します。
  4. side7:.php xxx$ git clone git@git01.phpfog.com:your_project_dir
    Cloning into 'your_project_dir'...
    The authenticity of host 'git01.phpfog.com (50.17.200.54)' can't be established.
    RSA key fingerprint is [Hex].
    Are you sure you want to continue connecting (yes/no)? yes
    Warning: Permanently added 'git01.phpfog.com,50.17.200.54' (RSA) to the list of known hosts.
    Identity added: /Users/xxx/.ssh/id_rsa (/Users/xxx/.ssh/id_rsa)
    remote: Counting objects: 3, done.
    Receiving objects: 100% (3/3), done.
    remote: Total 3 (delta 0), reused 0 (delta 0)
    
  5. リポジトリのクローンができました。
  6. side7:php xxx$ cd your_project_dir
    side7:your_project_dir xxx$ ls -la
    total 8
    drwxr-xr-x   4 xxx  staff  136 Feb 17 21:35 .
    drwxr-xr-x   6 xxx  staff  204 Feb 17 21:34 ..
    drwxr-xr-x  13 xxx  staff  442 Feb 17 21:35 .git
    -rw-r--r--   1 xxx  staff   30 Feb 17 21:35 index.php
    
V. 作成したクローンをEclipseにインポート
  1. EclipseでPHPプロジェクトを作成します。
    作成したクローンにプロジェクトを作成します。
  2. プロジェクトのシェア
    エクスプローラービューからプロジェクトを選択して、右クリックメニューのTeamからプロジェクトの共有を選択します。
  3. .gitignoreの作成と設定
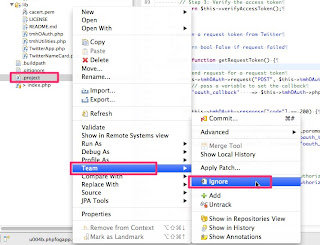
    エクスプロータービューから.buildpathを選択して、右クリックメニューのTeamからAdd .ignoreを選択します。.ignore自身、.project、.settingを.gitignoreに追加します。
VI. XAMPPの設定
  1. XAMPPの設定ファイルディレクトリに移動し、httpd.confをルート権限で開きます。
  2. side7:~ xxx$ cd /Applications/XAMPP/etc
    side7:etc xxx$ sudo vi httpd.conf
    Password:
    
  3. バーチャルホストの設定をhttpd.confにします。
    以下の設定を"Listen 80"以下に追加します。
  4. Listen 5000
    
    #
    # Virtual host configurations start from here
    #
    NameVirtualHost *:80
    NameVirtualHost *:5000
    
    
      DocumentRoot "/Applications/XAMPP/xamppfiles/htdocs"
      ServerName localhost


      DocumentRoot "/Users/xxx/dev/php/your_project_dir"
      ServerName localhost
    
    
    #
    # Enable AcceptMutex flock for using vhosts
    #
    AcceptMutex flock 
  5. http://localhost:5000/にアクセスすると、Hello Worldが見えます。

VII. 開発とアプリのアップロード
  1. index.phpを変更します。

    開発を楽しみましょう!
  2. ローカルリポジトリに変更をコミットします。
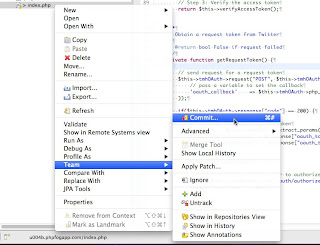
    右クリックメニューTeamからCommitを選択してコメントを記入します。
  3. 変更をリモートリポジトリに送信します。
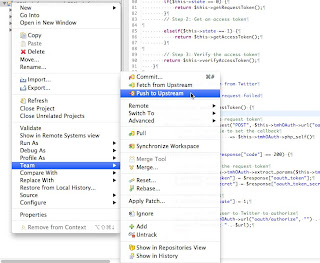
    右クリックメニューTeamからPushを選択します。
VIII. おめでとう!
PHP Fog上のアプリにアクセスしてみてください!!

参考リンク(英語)

Getting started with PHP app development on PHP Fog

This is basic tutorial for getting started with PHP app development on PHP Fog.


What I'll introduce
This is quick introduction how to develop PHP app with PHP Fog.
In this tutorial, the environment consists of Eclipse, XAMPP and web browser in Local, and using Git for uploading to PHP Fog.


My environment consists of
  • Mac OS X 10.7
  • Eclipse Helios
  • XAMPP 1.7.3
  • Git 1.7.8.4
Steps
I'll introduce by below steps.
I. Installing development environment
II. Create your app on PHP Fog
III. Generate your SSH key
IV. Create app's clone
V. Import app into Eclipse
VI. Setup XAMPP
VII. Development and push
I. Installing development environment
  1. Get Eclipse and install it. http://www.eclipse.org/
  2. Get PDT(PHP development tool) from your Eclipse and install it.
  3. Get EGit from your Eclipse and install it.
  4. Get XAMPP and install it. http://sourceforge.net/projects/xampp/
  5. Get Git and install it https://code.google.com/p/git-osx-installer
#When install application from Eclipse, select Install New Software from [Help] menu. Then select "Helios - http://download.eclipse.org/releases/helios" in the "work with" URL and select software you want to install.
II. Create your app on PHP Fog
  1. Access PHP Fog and sign up. https://phpfog.com/account
  2. Choose plan. (If you want to use cloud for free, choose shared plan.)
  3. Register your app's profile.
    You can select some apps or frameworks. Choose the app or the framework you like.
    If you'll develop simple PHP app, choose custom PHP app.
III. Generate your SSH key
  1. Create .ssh directory in your home dir, if you don't have it yet.
    side7:~ xxx$ mkdir ~/.ssh
    side7:~ xxx$ cd ~/.ssh
    
  2. Generate your SSH key in your .ssh dir.
    side7:.ssh xxx$ ssh-keygen -t rsa
    
    Generating public/private rsa key pair.
    Enter file in which to save the key (/Users/xxx/.ssh/id_rsa):
    Enter passphrase (empty for no passphrase):
    Enter same passphrase again:
    Your identification has been saved in /Users/xxx/.ssh/id_rsa.
    Your public key has been saved in /Users/xxx/.ssh/id_rsa.pub.
    The key fingerprint is:
    [HEX KEY such as 4b:32:...........] xxx@side7.local
    The key's randomart image is:
    +--[ RSA 2048]----+
    [image]
    [image]
    [image]
    [image]
    [image]
    [image]
    +-----------------+
    
  3. Check your SSH key
    side7:.ssh xxx$ ls
    id_rsa        id_rsa.pub
    
  4. Register your SSH Pub key into your PHP FOG Account
    Open your id_rsa.pub file and copy the entire text then access your account in PHP FOG and paste it.
IV. Obtain your app's clone from PHP Fog
  1. Move your project directory where you like.
  2. side7:php xxx$ cd /Users/xxx/dev/php/
    
  3. Clone your app repository.
  4. side7:.php xxx$ git clone git@git01.phpfog.com:your_project_dir
    Cloning into 'your_project_dir'...
    The authenticity of host 'git01.phpfog.com (50.17.200.54)' can't be established.
    RSA key fingerprint is [Hex].
    Are you sure you want to continue connecting (yes/no)? yes
    Warning: Permanently added 'git01.phpfog.com,50.17.200.54' (RSA) to the list of known hosts.
    Identity added: /Users/xxx/.ssh/id_rsa (/Users/xxx/.ssh/id_rsa)
    remote: Counting objects: 3, done.
    Receiving objects: 100% (3/3), done.
    remote: Total 3 (delta 0), reused 0 (delta 0)
    
  5. You'll see your app clone in your project dir.
  6. side7:php xxx$ cd your_project_dir
    side7:your_project_dir xxx$ ls -la
    total 8
    drwxr-xr-x   4 xxx  staff  136 Feb 17 21:35 .
    drwxr-xr-x   6 xxx  staff  204 Feb 17 21:34 ..
    drwxr-xr-x  13 xxx  staff  442 Feb 17 21:35 .git
    -rw-r--r--   1 xxx  staff   30 Feb 17 21:35 index.php
    
V. Import your project(clone) into eclipse as PHP project
  1. Create PHP project in your Eclipse.
    Create new PHP project in your Eclipse at your app clone.
  2. Share your project
    Open 
    explorer view and project then select "share project" from [team] in context menu.
  3. Create and set .gitignore file.
    Open explorer view and select .buildpath file then select "add .igonre" from [team] in context menu. Also add .ignore, .project and .settings/ into .ignore.
VI. Setup XAMPP
  1. Move to XAMPP conf dir and open httpd.conf as root.
  2. side7:~ xxx$ cd /Applications/XAMPP/etc
    side7:etc xxx$ sudo vi httpd.conf
    Password:
    
  3. Configure virtual host settings in httpd.conf.
    Add below settings under "Listen 80"
  4. Listen 5000
    
    #
    # Virtual host configurations start from here
    #
    NameVirtualHost *:80
    NameVirtualHost *:5000
    
    
      DocumentRoot "/Applications/XAMPP/xamppfiles/htdocs"
      ServerName localhost


      DocumentRoot "/Users/xxx/dev/php/your_project_dir"
      ServerName localhost
    
    
    #
    # Enable AcceptMutex flock for using vhosts
    #
    AcceptMutex flock 
  5. Access http://localhost:5000/. You'll see Hello World.

VII. Development and push your source code
  1. Modify index.php and enjoy development.

    ENJOY DEVELOPMENT!!
  2. Commit your change to your local repository.
    Select  "Commit" from [team] in context menu and select then fill in your comment and commit.
  3. Push your change to your remote repository.
    Select "push" from [team] in context menu.
VIII. Congratulation!
Access your app on PHP Fog!!

Useful links