ここで説明すること
この説明は最短ルートです。どのようにHerokuを使ったFacebookアプリ(PHP)開発をするかを説明します。
この説明ではEclipse, XAMPP, ブラウザをローカル環境で使用します。また、ソースコードアップロード用にGitを使います。

私の開発環境は以下のようになっています
- Mac OS X 10.7
- Eclipse Helios
- XAMPP 1.7.3
- Git 1.7.8.4
手順
以下の手順で説明をします。
I. 開発環境のインストール
II. HerokuにFacebookアプリを作成
III. SSH keyの作成
IV. リポジトリのクローンを作成
V. アプリをEclipseにインポート
VI. Eclipse上でのアプリ設定
VII. Facebook上にデバッグ用アプリを作成
VIII. XAMPPの設定
IX. 開発とプッシュ(アップロード)
I. 開発環境のインストール
- Eclipseを取得してインストールします。 http://www.eclipse.org/
- PDT(PHP development tool) をEclipseから取得してインストールします。
- EGitをEclipseから取得してインストールします。
- XAMPPを取得してインストールします。 http://sourceforge.net/projects/xampp/
- Gitを取得してインストールします。https://code.google.com/p/git-osx-installer
#Eclipseからインストールする場合は[Help]メニューからInstall New Softwareを選択します。その後、取得元に「Helios - http://download.eclipse.org/releases/helios」を選択して、インストールするものを選択します。
II. HerokuにFacebookアプリを作成
- Facebook Developersにアクセスして"アプリ"をクリックしてアプリを登録します。
- クラウドサービスの利用を選択し、Herokuを選択します。
- 環境(PHP)を選択してe-mailアドレスを入力してHerokuに移動します。
# もしHerokuにアカウントが無い場合は自動的にHerokuにアカウントが作成されます。Herokuのナビゲーションに従ってアカウントを活性化してください。 - Heroku上に作成されたアプリが表示されるでしょう。またあなたのアプリ名を確認してください。


III. SSH keyの生成(もしまだ持っていない場合)
- .sshをホームディレクトリに持っていない場合は作成します。
side7:~ xxx$ mkdir ~/.ssh
side7:~ xxx$ cd ~/.ssh
- ホームディレクトリでSSH keyを作成します。
side7:.ssh xxx$ ssh-keygen -t rsa

Generating public/private rsa key pair.
Enter file in which to save the key (/Users/xxx/.ssh/id_rsa):
Enter passphrase (empty for no passphrase):
Enter same passphrase again:
Your identification has been saved in /Users/xxx/.ssh/id_rsa.
Your public key has been saved in /Users/xxx/.ssh/id_rsa.pub.
The key fingerprint is:
[HEX KEY such as 4b:32:...........] xxx@side7.local
The key's randomart image is:
+--[ RSA 2048]----+
[image]
[image]
[image]
[image]
[image]
[image]
+-----------------+
- SSH keyを確認します。
side7:.ssh xxx$ ls
id_rsa        id_rsa.pub
IV. Heroku上にあるリポジトリのクローンをローカルに作成
- あなたの好きなプロジェクトディレクトリに移動します。
- リポジトリのクローンを作成します。
- リポジトリのクローンができました。
side7:php xxx$ cd /Users/xxx/dev/php/
side7:.php xxx$ git clone git@heroku.com:your_app_name.git -o heroku
Cloning into 'your_app_name'...
Warning: Permanently added the RSA host key for IP address '50.19.85.156' to the list of known hosts.
remote: Counting objects: 172, done.
remote: Compressing objects: 100% (104/104), done.
remote: Total 172 (delta 78), reused 132 (delta 62)
Receiving objects: 100% (172/172), 136.82 KiB | 33 KiB/s, done.
Resolving deltas: 100% (78/78), done.
side7:php xxx$ cd your_app_name
side7:your_app_url xxx$ ls -la
total 72
drwxr-xr-x  13 kensaku  staff    442 Feb 27 22:02 .
drwxr-xr-x   8 kensaku  staff    272 Feb 27 22:01 ..
drwxr-xr-x  13 kensaku  staff    442 Feb 27 22:02 .git
-rw-r--r--   1 kensaku  staff     86 Feb 27 22:02 .gitmodules
-rw-r--r--   1 kensaku  staff   1300 Feb 27 22:02 AppInfo.php
-rw-r--r--   1 kensaku  staff   1579 Feb 27 22:02 Readme.md
-rw-r--r--   1 kensaku  staff     60 Feb 27 22:02 channel.html
drwxr-xr-x   8 kensaku  staff    272 Feb 27 22:02 images
-rw-r--r--   1 kensaku  staff  13846 Feb 27 22:02 index.php
drwxr-xr-x   3 kensaku  staff    102 Feb 27 22:02 javascript
drwxr-xr-x   2 kensaku  staff     68 Feb 27 22:02 sdk
drwxr-xr-x   6 kensaku  staff    204 Feb 27 22:02 stylesheets
-rw-r--r--   1 kensaku  staff    275 Feb 27 22:02 utils.php
V. 作成したクローンをEclipseにインポート
- EclipseでPHPプロジェクトを作成します。
作成したクローンにプロジェクトを作成します。 - プロジェクトの共有
エクスプローラービューからプロジェクトを選択し、右クリックメニューのTeamからプロジェクトの共有を選択します。


VI. Eclipse上でのアプリ設定
- Facebook PHP SDKを取得してプロジェクトにインポートします。
Facebook PHP SDKをFacebook php-sdk git hubを取得し、"your_app_project/sdk/src"にインポートします。 - エクスプロータービューから.buildpathを選択して、右クリックメニューのTeamからAdd .ignoreを選択します。.ignore自身、.project、.setting、sdkを.gitignoreに追加します。

VII. デバッグ用アプリをFacebook上に作成
- Facebook Developersにサイドアクセスし、"アプリ"をクリックしてデバッグ用アプリを登録してください。アプリ名は"your_facebook_name debug"のように設定します。
- デバッグ用アプリのURL(ローカル)をhttp://127.0.0.1:6000のように登録します。

VIII. XAMPPの設定
- XAMPPの設定ファイルディレクトリに移動し、httpd.confをルート権限で開きます。
- バーチャルホストの設定とFacebookアプリの設定をhttpd.confにします。
以下の設定を"Listen 80"以下に追加します。 - http://localhost:5000/にアクセスするとHeroku上で見たFacebookアプリのテンプレートが見れます。
side7:~ xxx$ cd /Applications/XAMPP/etc
side7:etc xxx$ sudo vi httpd.conf
Password:
Listen 5000 # # Virtual host configurations start from here # NameVirtualHost *:80 NameVirtualHost *:5000DocumentRoot "/Applications/XAMPP/xamppfiles/htdocs" ServerName localhost DocumentRoot "/Users/xxx/dev/php/your_app_name" ServerName localhost SetEnv FACEBOOK_APP_ID your_app_id_for_real SetEnv FACEBOOK_SECRET your_app_secret_for_real # # Enable AcceptMutex flock for using vhosts # AcceptMutex flock
IX. 開発とアプリのアップロード
- index.phpを変更します。
開発を楽しみにましょう! - ローカルリポジトリに変更をコミットします。
右クリックメニューTeamからCommitを選択してコメントを記入します。
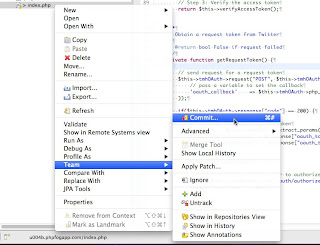
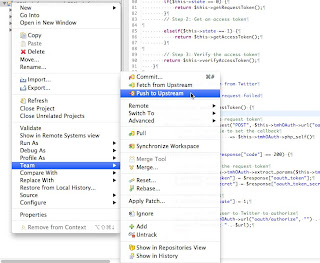
- 変更をリモートリポジトリに送信します。
右クリックメニューTeamからPushを選択します。


IIX. おめでとう!
Heroku上のアプリにアクセスして見てください!!
参考リンク(英語)

